Instructions
Tools you will need:
- Staple Gun and staples
- Table Saw
- Drill
- 5 pieces of 2 inch by 1 inch wood in 6 foot planks
- 4 L brackets
- 2 T brackets
- Upholstery Fabric
- Cotton Batting
- optional: buttons, which also require an upholstery needle and thread
Step 1: Measure the size you want your headboard to be, the height and length are completely up to you!
Step 2: Mark and cut 2 pieces for the length of the headboard and 3 pieces for the height.
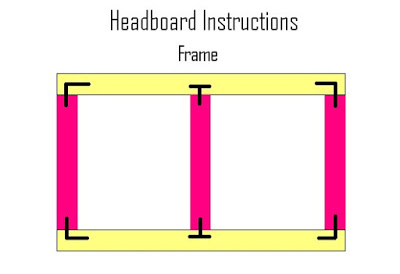
Step 3: Using the brackets, attach all the boards together like below.
Step 4: Now that the frame is built, it is time to pad it up! I used polyester batting, but you could use actual foam, or add more or less layers of batting depending on your preferences. I used 4 layers of batting, but to attach it, I just folded it over on itself 4 times so that I only had to staple the entire layer of batting once. The trick to stapling is to staple on the opposite side you attached the brackets on so that you don't have to worry about staples not going in, or working around the brackets. The first four staples will go in the order below, pulling each side tight before you staple.

Step 5: Once the first four staples have been attached, you can work towards the corners, in any order you like.
Step 6: Time to add the fabric! Do the first four staples the same way the batting was attached. It is really important to pull it VERY tight, and this may be where a second set of hands may be helpful. To keep the tightness and look consistant I put a staple every inch and a half or so.
Step 7 (Optional): If you would like to add buttons you will need to also add fabric to the back so you can sew them on. I just did a scrap piece of fabric pulled tight and roughly stapled every couple inches, no need to be tidy. I bought upholstery buttons that you cover in whatever fabric you choose, but you could use antique buttons or buttons you really like. You will need to attach them with upholstery thread and a long upholstery needle that is able to get through the layers of batting. You can add as many or as little as you like, in whatever pattern you want! Have fun~
And of course if you have any questions just ask! I would love to help~